Cocos3D 2.0.XでのARアプリ開発
このように、3Dオブジェクトをカメラプレビューに重ねる方法を解説します。
Cocos3D 2.0.Xの新規プロジェクト作成はうまくいきません。
チュートリアル動画にある通り、サンプルのHelloWorldをコピーしてプロジェクトを作成するのが良いようです。
Starting Cocos3d - 1 - Installing Cocos3d and starting a new project - YouTube
ベースとなるプロジェクトを"HelloAR"として作成したところから解説。
3Dオブジェクトの背景にカメラプレビューを表示する
コメントにある通り、以下のコメントを外し、Sceneのbackdropをコメントアウトする。
AppDelegate.m
-(CCScene*) startScene {
	:
	// For an Augmented Reality 3D overlay on the device camera, uncomment the following lines.
	// This must be done after the window is made visible. The 3D scene contains a solid backdrop.
	// To see the device camera behind the 3D scene, remove this backdrop, by commenting out the
	// backdrop property assignment in the initializeScene method of CC3HelloWorldScene.
	CC3DeviceCameraOverlayUIViewController* viewController = [[CC3DeviceCameraOverlayUIViewController alloc] init];
	viewController.isOverlayingDeviceCamera = YES;
	scene2D.colorRGBA = [CCColor colorWithCcColor4f: kCCC4FBlackTransparent];

	return scene2D;
}
HelloARScene.m
-(void) initializeScene {

	// Optionally add a static textured, or solid-color, backdrop, by uncommenting one of these lines.
//	self.backdrop = [CC3Backdrop nodeWithTexture: [CC3Texture textureFromFile: @"BrushedSteel.png"]];
//	self.backdrop = [CC3Backdrop nodeWithColor: ccc4f(0.4, 0.5, 0.9, 1.0)];
これだけで、Hello Worldの背景にカメラプレビューが表示されます。
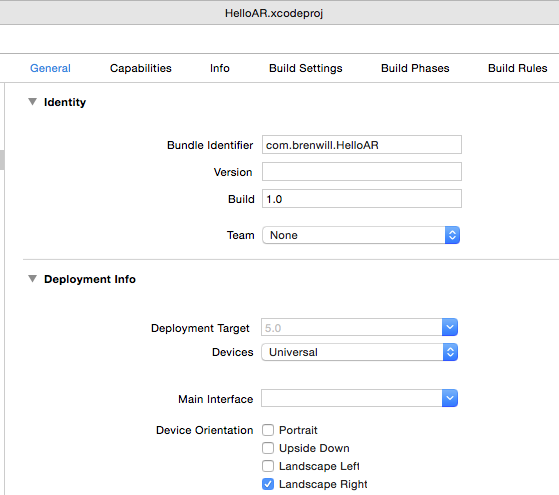
Landscape Rightにする
ハコスコで表示するため、LandscapeRightにする。
- Targetの設定
Target>General>Deployment Info
Device OrientationをLandscape Rightに。

- CCSetupScreenOrientationをLandscapeに設定
appDelegate.m
-(BOOL) application: (UIApplication*) application didFinishLaunchingWithOptions: (NSDictionary*) launchOptions {
	:
	   CCSetupAnimationInterval: @(1.0 / kAnimationFrameRate),	// Framerate (defaults to 60 FPS).
	   CCSetupScreenOrientation: CCScreenOrientationLandscape,		// Support all device orientations dyanamically
- deviceCameraView.layerのOrientationをLandscapeRightに設定する処理を追加する。
これをしないと、カメラプレビュー画像がPortraitのまま、90度回転して表示される。
AppDelegate.m
-(CCScene*) startScene {
	:
	// For an Augmented Reality 3D overlay on the device camera, uncomment the following lines.
	// This must be done after the window is made visible. The 3D scene contains a solid backdrop.
	// To see the device camera behind the 3D scene, remove this backdrop, by commenting out the
	// backdrop property assignment in the initializeScene method of CC3HelloWorldScene.
	CC3DeviceCameraOverlayUIViewController* viewController = [[CC3DeviceCameraOverlayUIViewController alloc] init];
	viewController.isOverlayingDeviceCamera = YES;
	scene2D.colorRGBA = [CCColor colorWithCcColor4f: kCCC4FBlackTransparent];
	//この行を追加
	[viewController.deviceCameraView.layer setOrientation:AVCaptureVideoOrientationLandscapeRight];

	return scene2D;
}
端末の姿勢に合わせてCC3Cameraの方向を制御する。
カメラの自動位置合わせをコメントアウト
起動時に3Dオブジェクト全体を捉えるようにカメラ位置を自動調整する機能が有効になっているので、コメントアウトする。
TwideeARScene.m
-(void) onOpen {
:
	// 以下の行をコメントアウト
	// Move the camera to frame the scene. The resulting configuration of the camera is output as
	// an [info] log message, so you know where the camera needs to be in order to view your scene.
	// [self.activeCamera moveWithDuration: 3.0 toShowAllOf: self withPadding: 0.5f]; // ここ。全体が表示されるようにカメラが動く。

	// Uncomment this line to draw the bounding box of the scene.
//	self.shouldDrawWireframeBox = YES;
}